How to Change Google Drive Folder Location in Windows 10 – Quickly and Easily

In the list of cloud services, Google Drive tops the list with Microsoft OneDrive. These drives allow users to sync all their data on the cloud. It allows you to access files and folders anywhere.
Google Drive can be used on your Windows PC. You can download the Backup & sync, Google Drive version on your device. It will back up and restore all your system data. For users who are new might be curious about Where is the Google Drive folder located? How does it work?
As you install Google Drive on your Windows device, a committed folder is created. To find it on your system drive Open C drive and then Users. Select your username and find the Google Drive folder. This folder will have all your drive data saved as backup.
You can change the location of this folder if required. Follow the methods below to change Google Drive folder location in Windows 10.
Methods to Change Google Drive Folder Location:
The write-up below mentions the two different solutions to how to move Google Drive folder in Windows 10. Read on to find the one that works best for you.
#1 Download Google Drive for Desktop and Install it
The users who have not downloaded the Google drive’s client for Backup and sync can follow the steps given below.
Step 1: The first thing to be done is to log out from your Google account on your web browser.
Step 2: Now search Google Drive on your browser. Move to the bottom of the official page and click on Drive for PC or Mac option under the Downloads section.
Step 3: In the new window that appears navigate to Backup and Sync and click on the Download option.
Step 4: To allow permission for download select the option that says ‘Agree and download’.
Step 5: Now provide the location at which you wish to save the downloaded file.
Step 6: Wait till the download completes, move to the location and open the file.
Step 7: Now follow the instructions to install the executable file. Once it is completed, close the window.
Step 8: On your System tray open the Backup & sync section and launch Google Drive.
Step 9: Enter your username and password after clicking on the Get Started option to log in with your account.
Step 10: Select the ‘Got it’ option once done. Select your upload preferences such as quality of uploads, etc. Now press the ‘Next’ button.
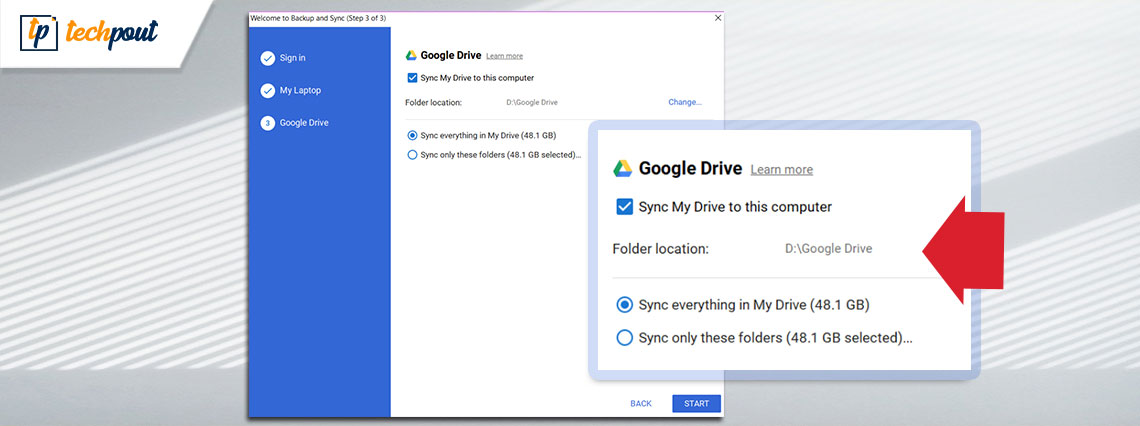
Step 11: On the next page you change your preference for sync. Here you will have the option to change the location of the Google Drive folder.
Step 12: Click on change and move to the required location for your Google Drive folder. Select the existing folder or create a new one to move your Drive folder.
Step 13: Click on Continue and then on Start. Now you can select files you want to create the backup on your Google Drive.
Also See: How to Find and Remove Duplicate Files in Google Drive?
#2 How to Relocate Google Drive folder
The Google Drive folder is situated at C:\user\<username>\Google Drive. If you already have an installed Backup and Sync version on your Windows PC move it to your required folder. Use the simple steps below to know how to move google drive folder.
Step 1: On the Taskbar find Backup and Sync and open it. If you are unable to find it on Taskbar look for it in the hidden icons section.
Step 2: Now on the desktop client for your Google Drive click on the ellipsis option i.e three vertical dots to open settings of Google Drive.
Step 3: Open Preferences from the list that appears in the dropdown.
Step 4: In the new screen again open Settings. Click on the Disconnect Account present next to your email.
Step 5: Now Allow the permission to Disconnect your credentials from the Google Drive client.
Step 6: Wait till the account gets disconnected. Now select the ‘Got it’ button.
Step 7: Launch the desktop client for Google drive again from the icon available on the taskbar of your Windows device.
Step 8: Enter your login credentials after clicking on the Get Started option to log in with your account. You can use the same account details again.
Step 9: Apply your upload preferences such as quality of uploads, etc. Press the ‘Next’ button.
Step 10: On the next page you can change the sync preference for your data. Also, you have an option to change the location of the Google Drive folder. Change it to your desired location.
Step 11: Click on Start once done to begin the backup process for your files and folders.
These are the two methods that can allow users to google backup and sync change folder location on their Windows PC.
Also See: How To Recover Deleted Files From Google Drive
Conclusion
The above guide can help you to change Google Drive folder location in Windows 10 or other versions. You can follow the simple steps on your desktop client for Google Drive to relocate the folder of your data backup.
If you found this information helpful drop your comments or suggestions below. For more such useful content subscribe to our newsletter. Follow us on Facebook, Twitter, Instagram, and Pinterest.


