Computer systems form an integral part of our life, but ensuring the safety of the data stored in it can be a highly challenging task. PC threats can either come from the internet spectrum or can find its way through various other sources.
USB and flash drives are a common source of PC threats and can be used to steal your files and damage your computer system. You can disable the USB ports to keep your system safe.
Disabling the USB ports in Windows prevents and blocks all unauthorized access of your system and enhances the security level of your device.
Finding it difficult to make the necessary alterations, well don’t worry we have got you covered. Refer to our blog and find simple yet effective ways to enable and disable the USB ports in Windows.
5 Best Methods to Enable or Disable the USB Ports in Windows:
- Lock the USB ports via registry entries.
- Disable USB ports in the BIOS setting of your computer.
- Disable the USB ports using the Device Manager.
- Uninstall and Reinstall the USB Mass Storage Drivers on your Device.
- Disconnect the USB
Method 1 : Lock the USB Ports via Registry Entries
- To start with, open the Run box by pressing the Windows + R key simultaneously on your keyboard.
- In the Run box type “regedit” and then press enter or hit the OK button.
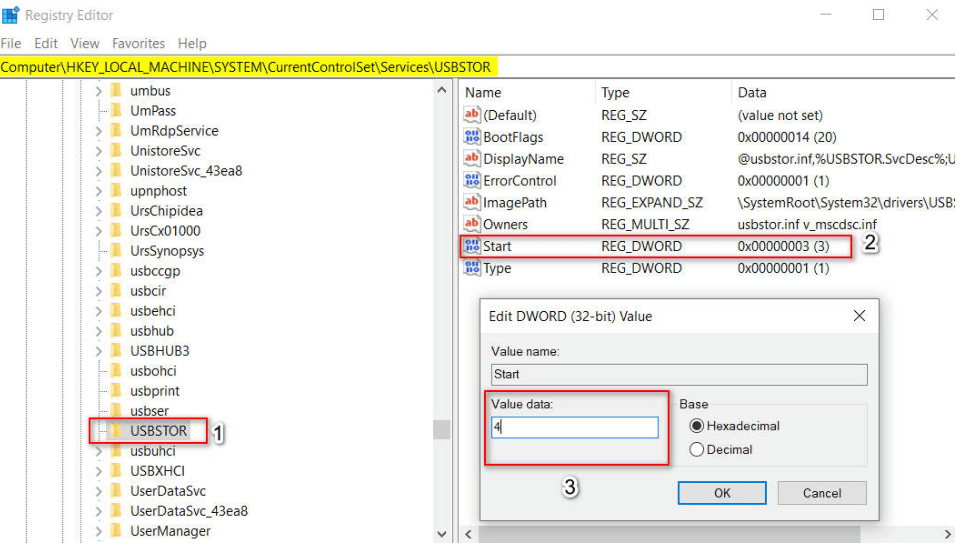
- Now, from the left side bar, navigate to the this key: HKEY_LOCAL_MACHINE\SYSTEM\CurrentControlSet\Services\USBSTOR

- Now access the right side bar and open the Start option by double clicking on it.
- In the Start box set the Value data to 4 to disable the USB port in Windows . Setting its value to 3 will enable it again.
Read More: How To Fix USB Port Not Working
Method 2: Disable USB Ports in the BIOS Setting of Your Computer
This method can be used to disable the USB ports on all Windows versions. It offers a convenient way to disable the USB flash driver, mouse and keyboard of your device. Stay attentive while you decide to use this method.
- Start/Restart your computer in the BIOS mode. Depending on the computer you can use these keys to enter the BIOS MODE F1, F2, F10, Esc, Delete, and key combinations like Ctrl + Alt + Delete or Ctrl + Alt + Esc.
- Locate the Integrated Peripherals tab by using the Orientation key.

- From the displayed list find the USB controller option and change its status to disable mode.
- Same steps can be repeated if you want to enable it in future.
Method 3. Disable the USB Ports Using the Device Manager
If the above methods have not been of great help to you, use the Device manager to disable the USB port on your Windows device.
- Open the Start Menu
- Type “devmgmt.msc” to open the Device Manager window.
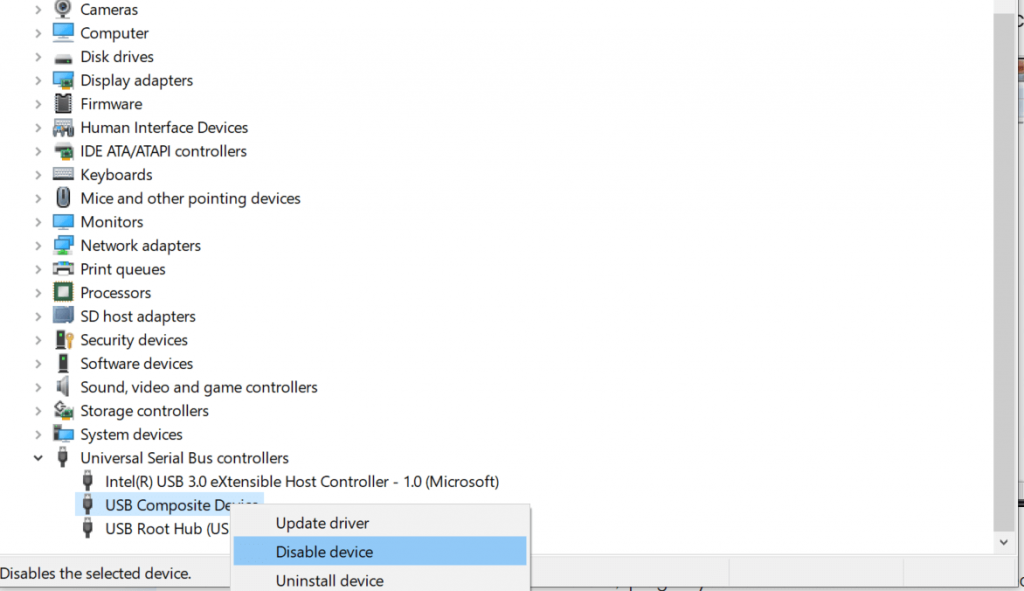
- Now select the Universal Serial Bus Controller option.
- A new window with the list of all USB ports will appear on your screen.

- Right click on it to enable or disable its functioning.
Read More: How to Install Windows 10 from USB
Method 4. Uninstall and Reinstall the USB Mass Storage Drivers on Your Device
- Open the Start Menu
- Type “devmgmt.msc” to open the Device Manager window.
- Now select the Universal Serial Bus Controller option.
- A new window with the list of all USB ports will appear on your screen.
- Right click on the USB port, from the drop down list click on the Uninstall button to uninstall and disable the USB port.
Method 5: Disconnect the USB Drive
If none of the above mentioned methods have worked in your favor then try disconnecting it from the motherboard. However removing all the USB ports is quite impossible; you can choose the one which can be easily removed by plugging out the cable.
So, these are few simple methods and ways in which you can enable/disable the USB port on your Windows device and protect its data from unauthorized access.


