One of the most annoying times in the world is when you have got tons of photos to transfer on your iPhone and it has run out of storage. There are plenty of photos in your phone that consume large storage space but you don’t want to erase them from your device. Thus, the only option you have left is to increase your iPhone’s storage capacity without needing an external source of memory.
The good thing is that you can compress photos on iPhone and iPad in order to reduce the size of photos. This will help you free up space on your phone and you will be able to welcome more sets of picture-perfect.
This article explains how to compress photos on iPhone or iPad and claim your device’s storage. If you are fretting over the memory capacity that has no rooms available for the newbies, then here is a guide for you sharing multiple ways to compress photos.
Tricks To Compress Photos On iPhone and iPad
There is more than just a single way to compress your photos on iPhone or iPad. If you are wondering how you nail the art of saving up space and keeping all the photos saved on your device, here are the tips for you to have for use. While there is a chance that you may not be happy with all of them, hopefully, you will find at least one way to get out of that dilemma.
Method 1: Save Memory Capacity By Compressing Photos With Email
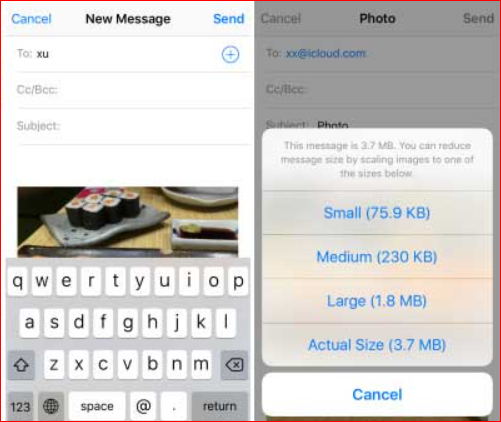
Sharing photos via Mail can be a quick and effective way to seek if you wish to compress the size of the photo and make some room in your device’s storage. While sharing photos via Mail from the Photos app, you will receive a prompt asking you to select a preferred size for the chosen photos in which you will also have a choice to keep the actual size. So, in order to compress the photos, this one may be the method for you.
To compress your photos via Mail, you can do this:
Step 1: Go to the Photos app on your iPhone/iPad.
Step 2: You can now go to the album where you have the photos that you wish to compress and select them.
Step 3: Then, you have to tap on the Share icon and then choose the Mail option to share the selected photos.
Step 4: Now, you have to input your email address and select the photo size from the prompt which includes Small, Medium, Large along with the actual one.

Step 5: Hit the Send button and share the compressed photos to your email.
Once you have shared the photos to your email address, you can download their compressed versions later to your Photos app. After that, you can remove the original photos from your iPhone.
Read Also: How To Transfer Photos From iPhone To Mac
Method 2: Compress Photos On Your iPhone or iPad By Taking Screenshots
Yes, it may sound pathetic to you but taking screenshots of the photos can be a steadfast way to compress them and cut back on the storage they consume on your device. If there are only a limited number of photos on your iPhone and even if you are looking for a way to reduce the size of a photo in order to quickly share it with someone to save the cellular data then taking then the method of taking screenshots can be carried out.
Here is how you can take screenshots of a photo on your iPhone:
Step 1: First, launch the Photos app on your device.
Step 2: Then, spot and open the photo that you would like to compress.
Step 3: If you have iPhone 6s, 6s Plus, 6, 6 Plus or former then you have to press and hold the Home and Sleep buttons simultaneously. If you own iPhone X, 8 Plus, 7 Plus, 7 or newer models then you have to hit the press and hold the Power and Volume Up buttons at the same time to take screenshots.
Step 4: Now, you should be able to view a screen pop-up for the screenshot that you have taken.
If you want, you can edit the screenshots and remove the original photos from your device. Know that the screenshots of the photos that you wish to remove will consume much less space on your phone.
Method 3: Compress Photos Using Optimize iPhone Storage
If you have the whole album of photos to compress on your iPhone then using the Optimize iPhone Storage feature on your device is probably the easiest way to do that. This feature is used to move or sync the existing photos from your device to iCloud storage. Such photos are left as thumbnails in the Photos app. You can use this feature to manage the photos stored in iCloud as well as locally.
You have to follow these steps to compress photos on your iPhone and iPad:
Step 1: First things first, Launch the Settings app on your iPhone and iPad.
Step 2: Now, tap the Photos & Camera option from the Settings section and select the Optimize iPhone Storage option.
Once you have done that, you will find the local photos sync to iCloud storage. Thus, you will have the compressed versions of photos on your iOS device. Know that iCloud storage will offer you 5Gb capacity. If you don’t find this amount enough then you can make a purchase for more iCloud storage space to store your photos.
Read More: How To Delete Apps On iPhone and iPad
Summary
So, there you go for saving the space on your iPhone and iPad. These surefire ways are your go-to tricks to effectively and quickly compress the photos and thus, free up the storage on your iOS devices without requiring an expandable source of capacity. Do you have more ideas to compress photos on iPhone and iPad? Don’t forget to drop them in the comment section.


