How to Fix Google Chrome Running Slow Issue

Google Chrome running slower than usual? Nothing to worry about, you can easily fix this issue with the potential solutions mentioned in this article.
Undoubtedly, Google Chrome is one of the best and the most accessible web browsers to surf the internet. But, still, there are chances when Chrome goes down and runs slower than expected. We understand it is painful and pathetic to have a slow web browser, especially Google Chrome, which claims to be one of the fastest browsers.
There are a plethora of factors that can deteriorate web page loading and make Google Chrome vulnerable. Well, whatever may be the cause, luckily, there are a few approaches for you to get Chrome back on the right track. But, before discussing those effective ways to deal with the issue, here is what kills the performance of your Chrome.
Why is Google Chrome Runs So Slow?
Following are the common reasons that can load web pages too slowly in Google Chrome:
- Background running apps, processes, and digital downloads.
- Programs and software updates.
- Imposing Chrome extensions.
- Disruptive or unstable internet connection.
- Limited hardware support and local storage.
Quick Solutions to Fix Google Chrome Running Slow Issue
Here we have put together a few effective solutions that you can use in order to fix Google Chrome running slow issues on your Windows PC. However, you do not need to try all of them, just make your way through each and choose the one that works best for you.
Solution 1: Close Unnecessary Tabs
You may experience Google Chrome running slow issues if you have opened numerous tabs on your respective browser. In Google Chrome, each tab triggers its own process on your computer system. These open tabs take an ample amount of resources, which will ultimately make Chrome slower than expected.
If you want to gather more information about how many PC resources your Chrome browser consumes, then you simply need to launch Task Manager. For doing that, you have to press CTRL + SHIFT + Esc keys together on your keyboard. Now, a confirmation box will appear asking for your permission. Just click on YES to continue.
In a Task Manager window, close those unnecessary processes & tabs. After that, reboot your computer and try to access the browser to see if this works for you. If not, jump on to the other solutions.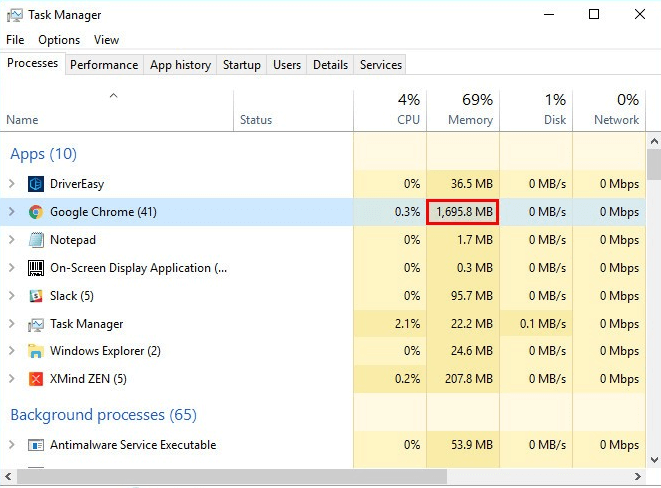
Also Read: Google Chrome Will Notify You When You Visit a Website That Loads Slowly
Solution 2: Disable Chrome Extensions and Blockers
The extensions on your Chrome browser can also eat a lot of resources when you are surfing the internet on Chrome. This eventually impacts the browser’s performance and makes it slow. Therefore, to fix the problem, you can try to disable the extensions and apps you no longer need. Here is how to do that:
Step 1: Open Google Chrome’s Settings page.
Step 2: Choose More Tools.
Step 3: Then, select Extensions from the available options.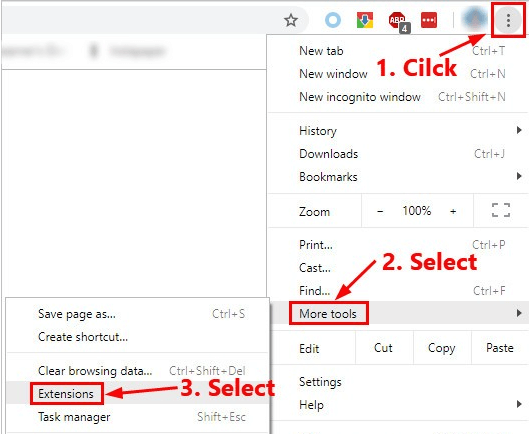
Step 4: Now, you need to disable the apps and extensions you do not need anymore. To do so, simply turn off the toggle button next to the app or extension you want to disable.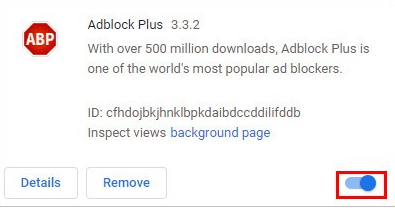
After disabling the useless extensions and apps, hopefully, you should see a difference in performance on your Chrome browser. If in case, this solution fails to troubleshoot the problem, then you need to implement more advanced fixes.
Solution 3: Turn on the Prediction Service on your Chrome
Prediction Service is a feature on Google Chrome that lets the browser predict your actions ahead of time so that it can boost the speed of page load times. Check to see if you enabled this option, if not, then follow the steps below to turn it on:
Step 1: Go to Google Chrome’s Settings page.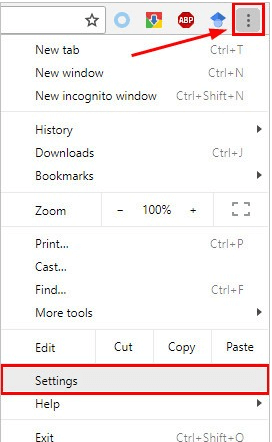
Step 2: Search for prediction and then enable it by turning on the toggle adjacent to the Use a prediction service to load pages more quickly.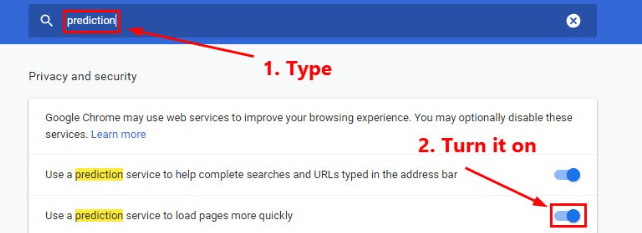
Once it’s done, open your Chrome browser again and check if the issue is resolved. If this fix didn’t help, then move on to the next tactics.
Solution 4: Disable Hardware Acceleration
If Google Chrome is still running slow, then try disabling hardware acceleration. Enabling this feature allows your preferred browser to depend on the GPU, not only the CPU to generate web pages. In most scenarios, it will speed up things. But, sometimes, hardware acceleration can also cause some serious and unexpected issues. In that case, it would be better to disable hardware acceleration to test the issue. Below is how to do that:
Step 1: Navigate to Google Chrome’s menu in the top right corner and choose Settings.
Step 2: Next, type hardware in the search bar. Then, you need to turn off the toggle presented next to the option Use hardware acceleration when available.
Step 3: After that, try to re-open your Google Chrome.
Now, check if the Google Chrome running slow issue is fixed. If not, then you can try other solutions explained below.
Also Read: Google to Introduce New Screenshot Feature in Chrome for Android
Solution 5: Reset Browser Settings
You can also try to reset the browser settings to resolve the problem. To do so, simply follow the steps shared below:
Step 1: On your Chrome, click on the three-dots (menu button) in the top-right corner and choose Settings to proceed.
Step 2: Now, you need to type reset in the search bar and then make click on the Restore settings to their original defaults.
Step 3: On the next prompt, click on Reset settings.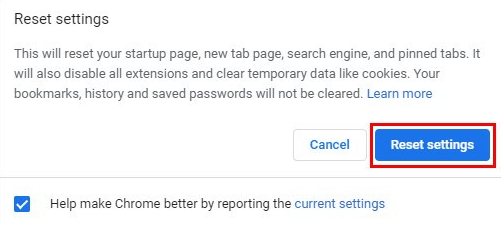
Important: Once you have reset your browser settings, then you’ll need to enable the trusted extensions. If you have no idea how to do it, then refer to Solution 2.
Solution 6: Update your Chrome to the Latest Version
If you haven’t updated your Chrome for so long and are using an outdated version, then this may be a culprit behind the slow performance issues. So, consider updating your Google Chrome to the latest version. Below is how to do that:
Step 1: Open Google Chrome, and click on the menu button shown in the top right corner. After that, choose Help, and then click About Google Chrome.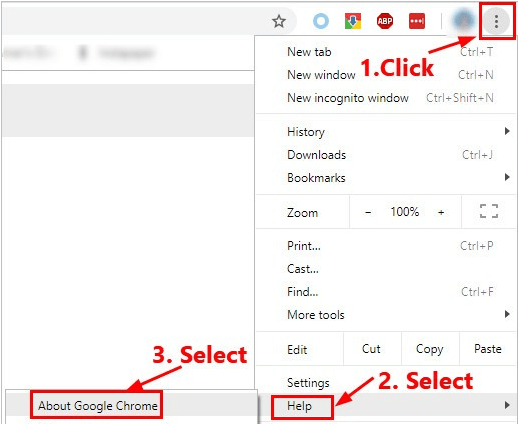
Step 2: Now Chrome searches for the available updates and will automatically update itself to the latest version.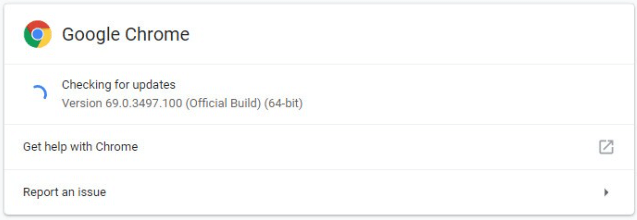
Once everything is done, re-open your Google Chrome to test the issue.
Bonus-Tip: Updating your Outdated Network Driver
If you are using an outdated, broken, or faulty network driver, then you may experience slow performance issues with your browser. Likewise, consider updating your network driver to check if the Google Chrome running slow problem persists.
There are mainly two ways to update outdated drivers i.e., manually or automatically.
Manual Driver Update: You can update drivers manually by going to the official website of the manufacturer, and searching for the correct driver file that is suitable for your Windows OS version. Later on, install it on your device.
Automatic Driver Update: Manual method is a bit time-consuming and complicated, especially for novices. So, in case, you do not have time, patience, or required technical knowledge to find and install the correct drivers manually, then you can do it automatically with Bit Driver Updater.
Bit Driver Updater is a smart driver updating program that automatically detects your system and finds the most reliable & up-to-date drivers for it. With this utility tool, you do not need to know exactly what OS and version your PC is running. Plus, there is no risk of downloading and installing the incorrect driver. In addition to this, you also do not have to worry about making mistakes while installing.
You can use either the free or pro version of the driver updater utility. But, with the pro version, it is just a matter of 2 clicks, also you receive full technical support and a 60-day complete money-back guarantee. However, the free version also works well, but it updates one driver at a time.
Follow the steps below to update your drivers with Bit Driver Updater:
Step 1: Click on the download button below to get the Bit Driver Updater’s setup.
Step 2: Follow the setup wizard to finish the installation.
Step 3: Once done, run the Bit Driver Updater and click on the Scan button from the left. Now, Bit Driver Updater will scan your PC and find problematic drivers.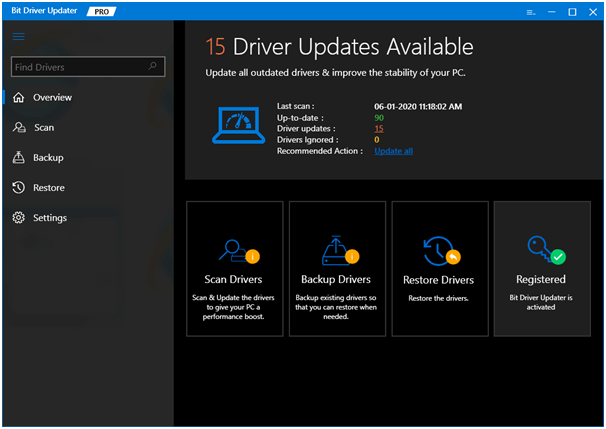
Step 4: After that, click on the Update Now button beside the network driver. Or, you can click Update All in order to install all the latest PC drivers in one click.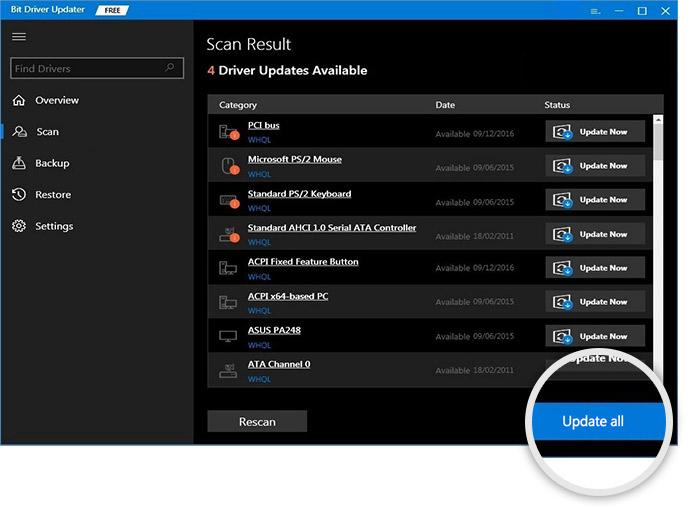
Also Read: Google Chrome’s New Feature to Block JavaScript Redirects on Webpage URL
How to Fix Google Chrome Running Slower: Explained
So, that’s all! Give each of the above-listed fixes a try in order to improve Chrome’s overall performance on your computer system. If in case, none of the solutions work, then there might be another problem with your device. Check your PC for any malware as a final resort. Unfortunately, if Google Chrome is still running slower than expected, then we suggest you make a switch to other renowned web browsers like Firefox and Microsoft Edge.
Please share your feedback with us through the comments section below. Also, follow us on Social Media – Facebook, Twitter, Instagram, and Pinterest.
